By default, Git doesn’t verify whether the name and email used for a commit actually belong to a real person. Anyone can use arbitrary data, which introduces a risk of tampering with the commit history. In certain cases, this allows someone to pass off someone else’s commits as their own—potentially to inject malicious code.
To verify that commits truly belong to a trusted author, Git supports signing them with GPG.
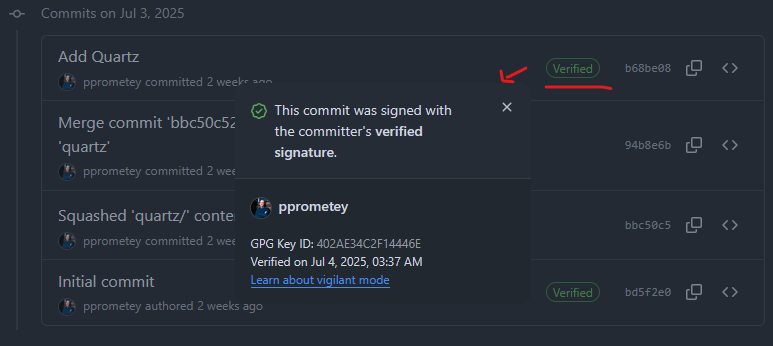
Here’s what it looks like visually (screenshot from GitHub):
Preparation
First, install GPG for Windows — Gpg4win.
During installation, make sure to select the GPG Agent component.
Generating Keys
Open a terminal (PowerShell or Git Bash) and run:
gpg --full-generate-keyYou’ll see something like this in the terminal:
Please select what kind of key you want:
   (1) RSA and RSA
   (2) DSA and Elgamal
   (3) DSA (sign only)
   (4) RSA (sign only)
   (9) ECC (sign and encrypt) *default*
  (10) ECC (sign only)
  (14) Existing key from card
Your selection? 1          # Select RSA and RSA

RSA keys may be between 1024 and 4096 bits long.
What keysize do you want? (3072) 4096
Requested keysize is 4096 bits  # Key length: 4096 bits

Key is valid for? (0) 1y         # Validity: 1 year
Key expires at: ...              # Confirm

Real name: Alexei Chernyavsky    # Same name as on GitHub
Email address: email@example.org
Comment: example.org

Change (N)ame, (C)omment, (E)mail or (O)kay/(Q)uit? O  # Confirm
After this, you’ll be prompted to enter a strong password to protect your private key.
To see your key ID, run:
gpg --list-secret-keys --keyid-format LONGSample output:
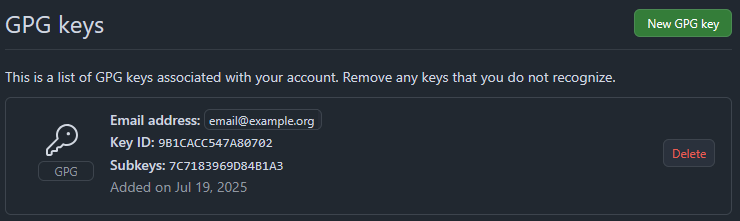
sec   rsa4096/98F2EBC6C153DED5E26D579E9B1CACC547A80702 2025-07-19 [SC]
      uid   [ultimate] Alexei Chernyavsky (example.org) <email@example.org>
      ssb   rsa4096/7C7183969D84B1A3 2025-07-19 [E]
Copy the long key ID shown after rsa4096/ — you’ll need it when configuring Git.
Exporting Your Public Key
Now export the public part of your key to a file:
gpg --armor --export email@example.org > ./pubkey_email_example_org.ascReplace email@example.org with your own email. The resulting file pubkey_email_example_org.asc will contain your GPG public key.
Uploading the Key to GitHub
Go to your GitHub GPG key settings, click New GPG Key, and paste the contents of the pubkey_email_example_org.asc file.
In the “Title” field, you can use your email or a description for the key.
If everything is done correctly, GitHub will list your new key and start verifying commit signatures.
You can upload multiple keys if you use different ones for different projects.
Configuring Git
Set the path to the GPG executable:
git config --global gpg.program "C:\Program Files (x86)\GnuPG\bin\gpg.exe"Set the signing key for the default Git profile (replace 98F2EBC6C153DED5E26D579E9B1CACC547A80702 with your actual key ID):
git config --global user.signingkey 98F2EBC6C153DED5E26D579E9B1CACC547A80702Enable automatic signing of all commits:
git config --global commit.gpgsign trueFrom now on, Git will sign your commits using GPG. When you commit, a window will prompt you to enter the password for your private key.
These settings will result in the following entries being added to your .gitconfig file:
[user]
  signingkey = 98F2EBC6C153DED5E26D579E9B1CACC547A80702
[commit]
  gpgsign = true
[gpg]
  program = C:\\Program Files (x86)\\GnuPG\\bin\\gpg.exe
Verifying the Signature
To verify that a commit is signed, use:
git log --show-signatureGit will display information about whether the commit is signed and which key was used.