Preface
The first version of this article was originally written as part of a research effort to find a flexible authorization mechanism for a corporate application our team was developing at the time. Standard solutions didn’t fit our needs because we were building a No-Code platform for automating business processes for large enterprises and government agencies.
The idea behind the platform was this: a business analyst, using a visual editor (built with React), could design user interfaces for various entities-such as a leave request form, product information, or employee data. They could configure access control for those entities, define business rules, and use a visual BPMN editor to create related business processes that interacted with these and other entities.
Based on these metadata definitions, the backend (written in ASP.NET Core) would dynamically generate database objects on the fly-tables, relationships, views, indexes, keys, etc. The platform supported both MSSQL and Postgres. SQL queries for interacting with these entities were also constructed dynamically (using sqlkata) based on the metadata.
At compile time, the application had no knowledge of the data structures, roles, or access rules-it was the business analyst who defined all of this at runtime, during the actual implementation of the end product built on our platform. Access control, therefore, had to work not only at the level of the entities (i.e., tables), but also at the level of specific instances (i.e., individual rows in those tables).
One of my first tasks was to design and implement such an authorization system. It needed to be flexible, general-purpose, and capable of adapting to the unique requirements of any customer-regardless of size or domain-without requiring changes to the platform’s core security and authorization logic.
At the time of writing the original article (early 2021), the idea was still just a concept. But now, as I write this preface (mid-2025), I can say with confidence that the concept proved itself fully in practice. It was successfully implemented and met all the functional and non-functional requirements. The approach is solid and production-ready.
I initially published this article on habr.com in two parts, which I’ll link at the end. In this edition, I’ve merged them into a single piece and removed less relevant details.
Introduction
This article introduces a new approach to authorization in cloud environments, based on an interpreted access control policy definition language called the Policy Modeling Language (PML). This language can be used to describe various access control models, including Access Control Lists (ACL), Role-Based Access Control (RBAC), Attribute-Based Access Control (ABAC), and more.
I’ll also discuss how this approach is implemented in practice via the cross-language Casbin authorization library.
Before we begin, I’d like to express my gratitude to the main author behind both the approach and the Casbin library, Yang Luo (GitHub). He’s also known as the creator of another widely used project, Npcap, which has been powering Wireshark since 2019.
Fundamentals of Authorization
At its core, any authorization process-no matter how complex-can be broken down into three fundamental components:
- Subject – The entity requesting access. This could be a user, service, or group of users.
- Object – The resource the subject is trying to access.
- Authorizer – The component responsible for making the decision to allow or deny access.
This relationship can be illustrated with the following functional diagram:
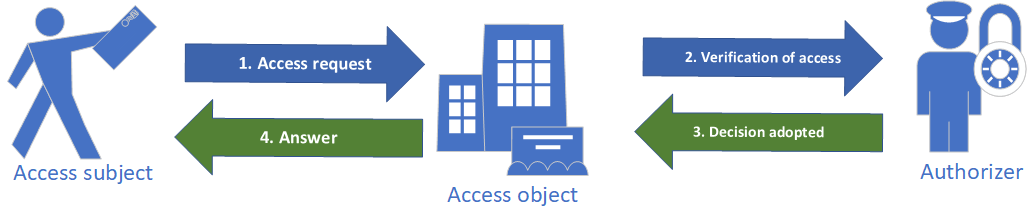
Fig.1. Conceptual schema of the authorization process.
- The subject attempts to access the object.
- The object queries the authorizer to determine whether access should be granted or denied.
- The authorizer evaluates the access request according to predefined logic. The most common approach is Role-Based Access Control (RBAC).
- Based on the authorizer’s decision, the object either allows or denies access to the subject.
Casbin
Casbin is an authorization library that supports multiple access control models, including ACL, RBAC, ABAC, and more. In the context of the conceptual schema shown in Fig.1, Casbin plays the role of the authorizer.
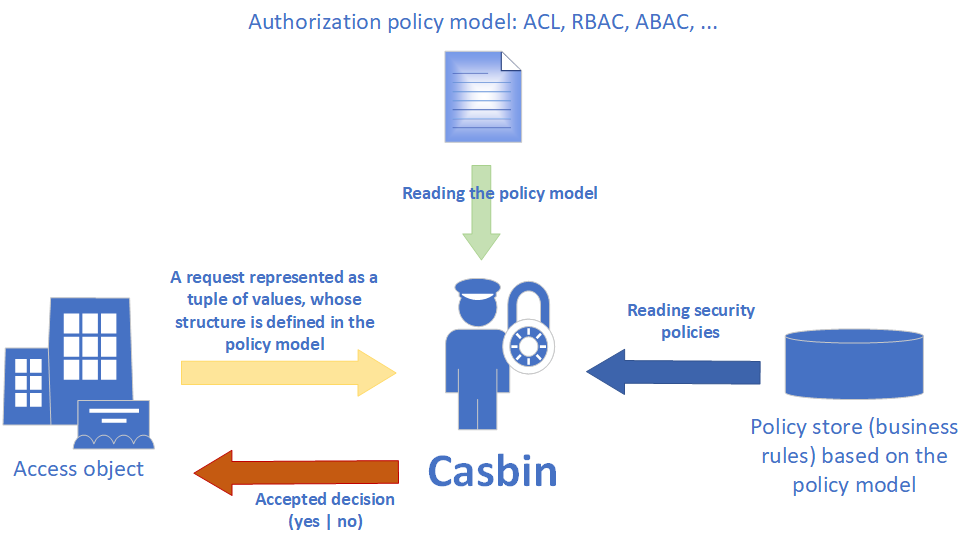
Fig.2. Conceptual schema of the authorization process using Casbin.
At the heart of Casbin’s mechanism is the authorization policy model. This model is described in a .CONF configuration file using a metamodel called PERM (Policy, Effect, Request, Matchers). Conceptually, it’s a structured collection of strings that define how authorization is performed.
The policy model specifies:
- The structure of the authorization request tuple
- The format and storage of authorization policies
- The logic used to evaluate requests
Policy storage can be a .csv file, a database table, or any other system, provided an appropriate adapter is implemented.
As mentioned above, PERM is a flexible metamodel for defining authorization logic. The name stands for:
- Policy – how access rules are defined
- Effect – the result of rule evaluation (allow or deny)
- Request – the structure of an incoming access request
- Matchers – expressions used to match requests against policies
A specific PERM instance, described in a .CONF file, defines how these four elements interact and drive the authorization process.
Example #1. Access Control List (ACL)
The best way to understand the PERM model is through a concrete example.
Imagine we have built a simple CRM system that stores a list of clients, and we want to implement a basic access control system to manage who can do what with the client resource. For this, the Access Control List (ACL) authorization model is suitable.
This model can be expressed as system requirements shown in the following table, which defines what actions are allowed or denied for users on the client resource:
| User/Action | Create (client.create) | Read (client.read) | Modify (client.modify) | Delete (client.delete) |
|---|---|---|---|---|
| Alice (alice) | yes | yes | yes | yes |
| Bob (bob) | no | yes | no | yes |
| Peter (peter) | yes | yes | yes | no |
Now we describe this model in a configuration file named client_acl_model.conf based on the PERM metamodel, and explain each section:
[request_definition]
r = sub, obj, act

[policy_definition]
p = sub, obj, act

[policy_effect]
e = some(where (p.eft == allow))

[matchers]
m = r.sub == p.sub && r.obj == p.obj && r.act == p.act
Each section of the model is defined as key = value. Each section has its own key.
First, in the [request_definition] section, we define the structure of the request (r). Here we specify that each request is a tuple of three elements: the first corresponds to the attribute sub (subject), the second to obj (object), and the third to act (action). For example, a valid request following this definition could be the array: ["alice","client","read"] (can alice read client?).
Next, the [policy_definition] section defines the structure of the stored policies. Typically, it mirrors the request structure. Additionally, every policy rule has a predefined attribute eft (effect), which can be either allow or deny. In this simple ACL policy model, we omit it as redundant.
The [policy_effect] section defines the overall effect when multiple policy rules match a request. Here we use e = some(where (p.eft == allow)), which means: if any matching policy rule has allow effect, then the final effect is allow. Otherwise, if no matching rule is found or all matched rules have deny, the final effect is deny.
In the [matchers] section, we specify a logical expression that matches a request (r) against a policy rule (p). Here we require that the first attribute of the request r.sub equals the first attribute of the policy p.sub, and (&&) likewise for the object r.obj == p.obj and the action r.act == p.act.
We have defined the authorization policy model. The next step is to specify policy rules based on the system requirements and the policy definition structure. These rules can be stored in a database or-in our case-in a .csv file named client_acl_policy.csv:
p, alice, client, create
p, alice, client, read
p, alice, client, modify
p, alice, client, delete

p, bob, client, read

p, peter, client, create
p, peter, client, read
p, peter, client, modify
Note that since we did not specify the eft attribute for any rule, all rules default to allow. Also, we do not define any deny rules, as this matches the policy effect logic defined in the model.
The final step is to combine the policy model, policy rules, and the Casbin library to implement access control in our CRM system.
For example, here is some C# code illustrating this. It’s simple and intuitive even for those unfamiliar with the language.
In .NET, Casbin provides an Enforcer class with multiple constructors. The simplest takes two string parameters pointing to the model and policy files:
// Create a new Enforcer instance
var e = new Enforcer("path/to/client_acl_model.conf", "path/to/client_acl_policy.csv");

// Define variables for the authorization request
var sub = "alice";
var obj = "client";
var act = "read";

// Perform the access check
if (e.Enforce(sub, obj, act)) {
    // access granted for alice to read client
} else {
    // deny access, show error
}
Example #2. Role-Based Access Control (RBAC)
Our authorization system works well for simple scenarios, but as the number of users grows, assigning permissions individually becomes tedious-especially when there are many permissions. Therefore, we developed a new version of the access control system based on roles, illustrated in the following diagram.
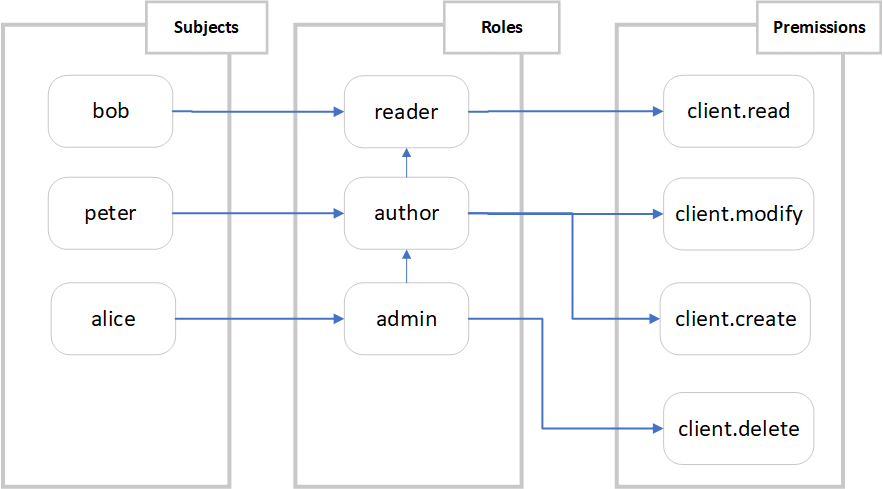
Fig.3. Role-Based Access Control (RBAC) schema.
We assign different roles to different users. The user bob is assigned the role of reader, peter is an author, and alice is now the CRM admin.
For each role, we define permissions. Instead of asking “which user can do what?” as in the ACL model, we ask which role can do what?
We also support role inheritance, enabling roles to have transitivity of permissions. In the diagram above, author inherits permissions from reader, and admin inherits from author. Each inheriting role has all the permissions of its parent plus its own.
Based on this design, the configuration file client_rbac_model.conf for our new policy model looks like this:
[request_definition]
r = sub, obj, act

[policy_definition]
p = sub, obj, act

[role_definition]
g = _, _

[policy_effect]
e = some(where (p.eft == allow))

[matchers]
m = g(r.sub, p.sub) && r.obj == p.obj && r.act == p.act
Here we see a new section [role_definition] for defining roles. The expression g = _, _ indicates that in the [matchers] section, we will match two values-r.sub and p.sub. This can be extended if, for example, the application supports multi-tenancy, which requires additional context during authorization (more on this later).
Another difference from the ACL model is the change in [matchers] where r.sub == p.sub is replaced with g(r.sub, p.sub), which means: if r.sub has the role (or inherits from) p.sub.
The contents of the client_rbac_policy.csv file with policy rules for this model look like:
p, reader, client, read
p, author, client, modify
p, author, client, create
p, admin, client, delete

g, bob, reader
g, peter, author
g, alice, admin

g, author, reader
g, admin, author
The example usage in application code is similar to the ACL example, except for the paths to the model and policy files:
var e = new Enforcer("path/to/client_rbac_model.conf",
    "path/to/client_rbac_policy.csv");

var sub = "alice";
var obj = "client";
var act = "read";

// Perform the check
if (e.Enforce(sub, obj, act)) {
    // access granted for alice to read client
} else {
    // deny access, show error
}
Example #3. Role-Based Access Control with Multitenancy (RBAC with domains/tenants)
As our CRM application evolved, it started attracting interest from other companies. To support this, we added a new column to the clients table-company-which stores the name of the company that owns each client. Based on this, we ensure that each company can only view its own clients, while hiding clients from other organizations. Bob, for example, joined another company and became its CRM administrator.
To support multitenancy, we simply add one more attribute to the authorization request tuple and update the policy model accordingly in the configuration file client_rbac_with_domain_model.conf. When defining roles and matching rules, this new attribute is taken into account:
[request_definition]
r = sub, dom, obj, act

[policy_definition]
p = sub, dom, obj, act

[role_definition]
g = _, _, _

[policy_effect]
e = some(where (p.eft == allow))

[matchers]
m = g(r.sub, p.sub, r.dom) && r.dom == p.dom && r.obj == p.obj && r.act == p.act
Compared to the RBAC model in Example #2, here we’ve introduced a new attribute dom (short for “domain” or “tenant”) in both the [request_definition] and [policy_definition] sections. This attribute represents the company the subject belongs to.
We also modified the [role_definition] to include a third parameter, changing g = _, _ to g = _, _, _, to evaluate role assignments with respect to a specific tenant.
In the [matchers] section, the matcher expression g(r.sub, p.sub) becomes g(r.sub, p.sub, r.dom) && r.dom == p.dom. This can be interpreted as: if r.sub has (or inherits) the role p.sub within the domain r.dom, and r.dom matches p.dom, then the request may be allowed.
The corresponding client_rbac_with_domain_policy.csv file defining the policy rules for this model might look like this:
p, reader, company1, client, read
p, author, company1, client, modify
p, author, company1, client, create
p, admin, company1, client, delete

p, reader, company2, client, read
p, author, company2, client, modify
p, author, company2, client, create
p, admin, company2, client, delete

g, author, reader, company1
g, admin, author, company1

g, author, reader, company2
g, admin, author, company2

g, alice, admin, company1
g, peter, author, company1

g, bob, admin, company2
Each user is now assigned a role within a specific company, and role inheritance is also scoped to the company level. This allows you to implement strict tenant isolation while still benefiting from the flexibility of the RBAC model.
Example #4. Access Control Based on a RESTful Model
This model supports implementing authorization logic where REST API resources act as objects, typically represented as URI paths like /res/* or /res/:id, and HTTP methods (GET, POST, PUT, DELETE) act as actions.
This flexibility is made possible through the use of built-in and custom functions, along with regular expressions in the [matchers] section.
Here’s what the configuration file looks like (based on the official Casbin example):
[request_definition]
r = sub, obj, act

[policy_definition]
p = sub, obj, act

[policy_effect]
e = some(where (p.eft == allow))

[matchers]
m = r.sub == p.sub && keyMatch(r.obj, p.obj) && regexMatch(r.act, p.act)
In this configuration:
keyMatchis used to support wildcard-like matching in URLs (e.g./alice_data/*).regexMatchallows for flexible pattern matching on HTTP methods.
And here’s a sample policy file:
p, alice, /alice_data/*, GET
p, alice, /alice_data/resource1, POST

p, bob, /alice_data/resource2, GET
p, bob, /bob_data/*, POST

p, cathy, /cathy_data, (GET)|(POST)
This allows:
aliceto performGETon any resource under/alice_data/, andPOSTon a specific resource.bobtoGETone ofalice’s resources andPOSTto anything under/bob_data/.cathyto bothGETandPOSTto/cathy_data.
Such a model is ideal for web applications with a RESTful backend, where permissions must be expressed in terms of URL patterns and HTTP verbs.
Example #5. Attribute-Based Access Control (ABAC)
The core idea behind the ABAC model is quite simple: authorization policies are not based on roles, but on attributes of the subject, the object, the action, and the environment. These are commonly referred to as ABAC attributes.
There exists a complex standard for ABAC called XACML, but Casbin offers a much simpler version. One of the key differences is that Casbin allows using full objects or class instances instead of just strings for attributes.
As in the previous example, we’ll use an official sample from the Casbin documentation.
Here’s what a basic ABAC policy model might look like:
[request_definition]
r = sub, obj, act

[policy_definition]
p = sub, obj, act

[policy_effect]
e = some(where (p.eft == allow))

[matchers]
m = r.sub == r.obj.Owner
This looks similar to previous models, except that in the [matchers] section we compare r.sub with the Owner property of an object passed to r.obj. Casbin uses reflection to retrieve the value of the Owner property from the class instance provided in the request.
Here’s the class that would represent our object:
public class ResourceObject
{
    ...
    public string Owner { get; set; }
}
You can also match multiple ABAC attributes, for example:
[matchers]
m = r.sub.Domain == r.obj.Domain
Currently, ABAC attributes can only be extracted from the authorization request elements (e.g. r.sub, r.obj, r.act). You cannot extract attributes from policy elements (p.sub, p.obj, etc.) since there’s no way to map those to structured types in Casbin.
However, Casbin does support more advanced ABAC scenarios using a technique called model scaling, where the matching logic is moved into the policy itself using the eval() function.
Here’s an example policy model abac_scale_model.conf using eval():
[request_definition]
r = sub, obj, act

[policy_definition]
p = sub_rule, obj, act

[policy_effect]
e = some(where (p.eft == allow))

[matchers]
m = eval(p.sub_rule) && r.obj == p.obj && r.act == p.act
In this model:
- We define a new field
sub_rulein[policy_definition]. - In
[matchers], we useeval(p.sub_rule), which will evaluate dynamic expressions at runtime.
Example policy file abac_scale_policy.csv:
p, r.sub.Age > 18, client1, read
p, r.sub.Age < 60, client2, write
And here’s how it looks in code:
public class User
{
    public int Age { get; set; }
    public string Name { get; set; }
}

class Program
{
    static void Main(string[] args)
    {
        var e = new Enforcer("path/to/abac_scale_model.conf",
            "path/to/abac_scale_policy.csv");

        var sub = new User() { Name = "alice", Age = 19 };
        var obj = "client1";
        var act = "read";

        if (e.Enforce(sub, obj, act)) {
            // access granted for alice to read client1
        } else {
            // deny access, show error
        }
    }
}
This shows how Casbin can support attribute-rich and dynamic authorization logic while keeping the configuration and code relatively clean.
Practical Example for a Real-World Application
Let’s imagine we’re building an authorization mechanism for a CMS. Users can add articles via an admin panel. A user with the user role can only view their own articles. They can’t see others’ articles unless they have the role of admin or supervisor. A supervisor can view and edit all articles, while an admin has all the permissions of a supervisor plus the ability to delete any article.
We’ll first try to solve this using the traditional SQL approach. Then we’ll implement it using Casbin.
Database Structure and Sample Data
Our CMS database schema:
erDiagram
    Users {
        int id PK
        string UserName
    }

    Roles {
        int id PK
        string role
        int userId FK
    }

    Articles {
        int Id PK
        string Name
        string Description
        string ArticleContent
        int Owner FK
    }

    Users ||--o{ Articles : "owns"
    Users ||--o{ Roles : "has"
Users table:
| id | UserName |
|---|---|
| 1 | Alice |
| 2 | Bob |
| 3 | Peter |
Roles table:
| id | role | userId |
|---|---|---|
| 1 | admin | 3 |
| 2 | supervisor | 2 |
| 3 | user | 1 |
Here, Peter is an admin, Bob is a supervisor, and Alice is a standard user.
Articles table:
| Id | Name | Description | ArticleContent | Owner |
|---|---|---|---|---|
| 1 | A | A | A | 1 |
| 2 | A1 | A1 | A1 | 1 |
| 3 | A1 | A1 | A1 | 1 |
| 4 | B | B | B | 2 |
| 5 | B1 | B1 | B1 | 2 |
| 6 | B2 | B2 | B2 | 2 |
| 7 | P | P | P | 3 |
| 8 | P1 | P1 | P1 | 3 |
Traditional SQL-Based Approach
We won’t dive deep into every scenario. Instead, here’s how to construct SQL queries for access filtering:
For admin (Peter, id=3):
SELECT * FROM articles a
LEFT JOIN roles r ON r.userId = 3
WHERE a.owner = 3
   OR (r.role IN ('admin', 'supervisor'))
Result:
| Id | Name | Description | ArticleContent | Owner | id | role | userId |
|---|---|---|---|---|---|---|---|
| 1 | A | A | A | 1 | 1 | admin | 3 |
| 2 | A1 | A1 | A1 | 1 | 1 | admin | 3 |
| 3 | A1 | A1 | A1 | 1 | 1 | admin | 3 |
| 4 | B | B | B | 2 | 1 | admin | 3 |
| 5 | B1 | B1 | B1 | 2 | 1 | admin | 3 |
| 6 | B2 | B2 | B2 | 2 | 1 | admin | 3 |
| 7 | P | P | P | 3 | 1 | admin | 3 |
| 8 | P1 | P1 | P1 | 3 | 1 | admin | 3 |
For supervisor (Bob, id=2):
SELECT * FROM articles a
LEFT JOIN roles r ON r.userId = 2
WHERE a.owner = 2
   OR (r.role IN ('admin', 'supervisor'))
Result:
| Id | Name | Description | ArticleContent | Owner | id | role | userId |
|---|---|---|---|---|---|---|---|
| 1 | A | A | A | 1 | 2 | supervisor | 2 |
| 2 | A1 | A1 | A1 | 1 | 2 | supervisor | 2 |
| 3 | A1 | A1 | A1 | 1 | 2 | supervisor | 2 |
| 4 | B | B | B | 2 | 2 | supervisor | 2 |
| 5 | B1 | B1 | B1 | 2 | 2 | supervisor | 2 |
| 6 | B2 | B2 | B2 | 2 | 2 | supervisor | 2 |
| 7 | P | P | P | 3 | 2 | supervisor | 2 |
| 8 | P1 | P1 | P1 | 3 | 2 | supervisor | 2 |
For user (Alice, id=1):
SELECT * FROM articles a
LEFT JOIN roles r ON r.userId = 1
WHERE a.owner = 1
   OR (r.role IN ('admin', 'supervisor'))
Result:
| Id | Name | Description | ArticleContent | Owner | id | role | userId |
|---|---|---|---|---|---|---|---|
| 1 | A | A | A | 1 | 3 | user | 1 |
| 2 | A1 | A1 | A1 | 1 | 3 | user | 1 |
| 3 | A1 | A1 | A1 | 1 | 3 | user | 1 |
Now let’s try solving the same authorization problem using the Casbin approach.
Approach Using Casbin
First, it’s important to clarify that in the PERM model, a resource is not an instance of an entity, but the entity itself.
In our case, when we define the authorization model, the resource refers to the Article entity (i.e., the table), not a specific row (e.g., Id=1) in that table.
Next, we need to clarify that the roles described in this use case are not traditional roles as defined by classical RBAC. In a typical RBAC setup, roles describe what actions can be performed on a resource. For example:
- A
usermight only be allowed to read articles. - An
authormight inherit theuserrole and also be able to edit and create articles. - An
adminmight inherit everything and additionally be able to delete articles.
However, in our CMS use case, all three roles - user, supervisor, and admin - share the same set of permissions: they can all create, edit, and delete articles.
The difference lies not in what actions they can perform, but in what data they can access:
- A
usercan see and edit only their own articles. - A
supervisorand anadmincan see all articles. - An
admincan also delete articles that belong to other users.
This highlights a major limitation of the RBAC model: it is inherently static and cannot express business rules based on dynamic or runtime attributes. This challenge is discussed in detail in the article Access Control Approaches: RBAC vs. ABAC.
The roles we use here (user, supervisor, admin) are examples of contextual roles or dynamic roles, and there are different ways to implement them. The classic SQL-based approach we used earlier is one such method.
Filtering Records with Contextual Roles
Let’s define a basic RBAC policy model (rbac_model.conf) using Casbin:
[request_definition]
r = sub, obj, act

[policy_definition]
p = sub, obj, act

[role_definition]
g = _, _

[policy_effect]
e = some(where (p.eft == allow))

[matchers]
m = g(r.sub, p.sub) && r.obj == p.obj && r.act == p.act
Next, we remove the Roles table entirely. Roles are now managed within the policy storage, which could be a .csv file or a database table.
For simplicity, we’ll use a CSV file: rbac_policy.csv:
p, user, article, read
p, user, article, modify
p, user, article, create
p, user, article, delete

g, supervisor, user
g, admin, supervisor

g, 1, user
g, 2, supervisor
g, 3, admin
Here’s what this means:
- The
userrole has full access to articles (read, modify, create, delete). - The
supervisorrole inherits fromuser. - The
adminrole inherits fromsupervisor. - User
1(Alice) is auser, user2(Bob) is asupervisor, and user3(Peter) is anadmin.
This policy setup is sufficient to solve our access control logic using the PERM model.
Here’s how to apply this model in a C# application:
public IList<Article> GetArticlesForAdminPanel(int currentUserId)
{
    var e = new Enforcer("CasbinConfig/rbac_model.conf",
        "CasbinConfig/rbac_policy.csv");

    var obj = "article";
    var act = "read";

    // First, check if the user is allowed to read articles
    if (e.Enforce(currentUserId.ToString(), obj, act))
    {
        // Get user roles
        var currentUserRoles = e.GetRolesForUser(currentUserId.ToString());

        // Check if the user is admin or supervisor
        var isAdmin = currentUserRoles.Any(x =>
            x == "admin" || x == "supervisor");

        // If admin or supervisor -> return all articles
        // Otherwise -> return only articles owned by the current user
        if (!isAdmin)
            return _context.Articles.Where(x =>
                x.OwnerId == currentUserId).ToList();
        else
            return _context.Articles.ToList();
    }
    else
    {
        // Deny access
        throw new Exception("403 Forbidden: You do not have permission to view articles.");
    }
}
This approach effectively solves the problem of record filtering using context-aware roles.
Editing Articles with Contextual Roles
Now let’s take it a step further. We’ve fetched the list of articles and displayed them in the admin panel. Next, we want to edit one of the articles. We need to determine whether the current user has permission to do that.
- A user with the
userrole can only edit their own articles. - A
supervisororadmincan edit any article.
To support this, we define a new policy model called rbac_with_abac_model.conf:
[request_definition]
r = sub, obj, act

[policy_definition]
p = sub, obj, act

[role_definition]
g = _, _

[policy_effect]
e = some(where (p.eft == allow))

[matchers]
m = (r.sub == r.obj.OwnerId.ToString() || g(r.sub, "supervisor")) && g(r.sub, p.sub) && r.act == p.act
This model is similar to the one used for reading articles, with one key difference in the [matchers] section.
Instead of r.obj == p.obj, we now have:
(r.sub == r.obj.OwnerId.ToString() || g(r.sub, "supervisor"))This can be read as:
The user (r.sub) must either be the owner of the article (r.obj.OwnerId) or belong to the supervisor group.
Since the admin role inherits from supervisor, admins will also satisfy this condition.
We do not change the policy file - it remains the same. Now, here’s what this logic looks like in code:
public void UpdateArticle(int currentUserId, Article newArticle)
{
    var e = new Enforcer("CasbinConfig/rbac_with_abac_model.conf",
        "CasbinConfig/rbac_policy.csv");

    var act = "modify";

    // Check if the user has permission to edit this article
    if (e.Enforce(currentUserId.ToString(), newArticle, act))
    {
        // Apply updates and save changes
        _context.Articles.Update(newArticle);
        _context.SaveChanges();
    }
    else
    {
        // Deny access
        throw new Exception("403 Forbidden: Insufficient permissions");
    }
}
Notice how we pass the actual article object as the second argument to the e.Enforce() method.
This enables Casbin to inspect the OwnerId property of the article using reflection.
Next, we’ll look at how to handle article deletion.
Вот адаптированный перевод этого раздела на английский, в формате Markdown:
Deleting Articles
Our business rule for deletion is as follows:
- A user with the
userrole can delete only their own articles. - A
supervisoris not allowed to delete articles created by others. - An
admincan delete any article.
Let’s describe this rule using a PERM policy model, saved in the file delete_model.conf:
[request_definition]
r = sub, obj, act

[policy_definition]
p = sub, obj, act

[role_definition]
g = _, _

[policy_effect]
e = some(where (p.eft == allow))

[matchers]
m = (r.sub == r.obj.OwnerId.ToString() || g(r.sub, "admin")) && g(r.sub, p.sub) && r.act == p.act
This model is almost identical to the one we used for editing, except for one important change:
We only allow the admin role to delete other users’ articles.
If someone with the supervisor role attempts to delete another user’s article, they will get a permission denied error.
And just like before, the code to enforce this rule is very similar to the editing example:
public void DeleteArticle(int currentUserId, Article deleteArticle)
{
    var e = new Enforcer("CasbinConfig/delete_model.conf",
        "CasbinConfig/rbac_policy.csv");

    var act = "delete";

    // Check if the user has permission to delete the article
    if (e.Enforce(currentUserId.ToString(), deleteArticle, act))
    {
        // Remove the article
        _context.Articles.Remove(deleteArticle);
        _context.SaveChanges();
    }
    else
    {
        // Deny access
        throw new Exception("403 Forbidden: Insufficient permissions");
    }
}
Again, we pass the full article object to the Enforce() method so Casbin can inspect its OwnerId property and apply the rule accordingly.
Summary
Casbin is a powerful and flexible authorization library built around an interpretable policy definition language called PERM (Policy Enforcement Role Model). It enables developers to implement common access control models out of the box, extend or combine them, or even define entirely new ones.
At its core, Casbin includes a policy model interpreter that evaluates access requests based on the attributes passed at runtime and the access rules defined in a security policy store. These rules are described using the PERM model language (PML). Casbin is available for many popular programming languages.
I hope the examples in this article have demonstrated the flexibility, generality, and clarity of Casbin and the PERM model when implementing real-world access control and authorization mechanisms.
It’s worth noting that both policy models and policy rules can be stored in a database, and Casbin supports policy filtering to help scale access control in high-load systems with large rule sets.
Under the hood, Casbin for .NET uses DynamicExpresso.Core to interpret C#-style expressions inside policy matchers. This makes it possible to evaluate dynamic conditions efficiently - a major advantage in complex authorization scenarios.
Despite being relatively young, Casbin is evolving quickly. It’s already used in many production systems and is supported by a growing ecosystem of tools and APIs - such as the admin portal UI for managing policies visually.
The full, self-contained code example used throughout this article is available on my GitHub repository. Feel free to clone it and experiment!
References & Useful Links
- Official Casbin website
- List of Casbin adapters for various storage backends
- Loading policy models into the Enforcer
- ASP.NET Core integration using Casbin middleware
- RBAC vs. ABAC - Access control models explained (in Russian)
- Casbin for Elixir
- Part 1 of the original article on Habr (in Russian): RBAC? ABAC?.. PERM! A new take on access control for cloud web services and apps
- Part 2 (practical example): Flexible authorization using Casbin and PERM